Monday, 12 December 2011

Possible Music

I was looking into ideas for the music I could have playing in the background of my scene. I wanted it to be Star Wars related obviously. I searched YouTube for related clips and also to do with the planet 'Mustafar' as that was the planet my scene was based around.

I eventually managed to come across this:


http://www.youtube.com/watch?v=799I3-jCWtI

Accessed [12/12/2011]


I thought this music would fit quite appropriately. It was roughly about 3 minutes long in total so it was more than enough for the 30 second clip I needed to create. 

Lasers Tutorial

Here is a clip I found of a laser tutorial. If I get time, I will try to incorporate it into my video.


Accessed [12/12/2011]

Filming Tutorial

Before I started to film my animation, I wanted to practice the tutorial to make sure I knew how to film properly. I opened up a completely blank file just so I didn't accidentally mess anything up on my volcanic scene.

To start off with, I drew a line by going to the 'Create' menu, then down to 'Shapes' and chose 'Line'.


I then drew a line in one of the viewpoints. This line was going to be the camera path.


Once I had drawn the line, I wanted to create an object to film. I went to the 'Create' menu again and this time chose a 'Cone' from the 'Standard Primitives'. 


I then created a small cone in one of the viewpoints, which was positioned round about in the centre of the line I'd just drawn. 


Now that I had both my camera path and my object created, it was time to create a camera. To do this, I went to the 'Create' menu again and chose 'Cameras' and then 'Target Camera'.


I was now able to draw my camera onto the viewpoint on the line path I'd made, making sure to direct the camera directly towards the cone. 


I then went to the 'Motion' on the right in order to set the camera up completely.


 I expanded the 'Assign Controller' and clicked on 'Position' and the small icon just above it to open a the new position window.


When the new window opened, I selected the 'Path Constraint' option and pressed 'OK'. 

Back in the 'Motion' panel, I scrolled down to where it said 'Add Path'. I clicked on this, and then selected the line I drew earlier. 


As soon as I had selected the line, the camera immediately repositioned itself to the very beginning of the line. I could now press the 'Play' button and press 'C' to see the camera view.

I did play around with the Timeline slightly, just be adding more frames in etc. to draw the scene out a bit. 

Adding Lights

I now wanted to add some lights to my scene in preparation for the animation. I needed to add some lights in otherwise at certain angles, my scene would be in darkness.

In order to add lights in, I went to the 'Create' menu option at the top. I then chose 'Standard Lights', and 'Omni' from the list of lights available. I chose Omni because I wanted the first light to be at the top of the sky dome to emit a general light across the whole scene. 


Once I'd chosen the light I wanted to use, I clicked on the screen to place it. I then used the 'Move' tool to position the light in the very top, in the centre of the sky dome. 


Now that my light was in the correct position, I played around with some of the settings to make it how I wanted. At first when I added the light it was so bright that it made my lava look almost yellow, which is not the effect I was after at all. I wanted to change the colour of the light so that it was perhaps a reddish/orangey colour as that was the colour of the sky I had used. I though that by using this colour to light the scene it would add to the volcanic planet feel and create the right mood. 


After I'd played around with the colours, I decided against using a dark or vibrant red as this had too much of an impact and looked dramatically over the top. I played around with the 'Multiplier' option too as this altered the intensity of the light. Eventually, I decided on keeping the 'Multiplier' option at '1.0' and instead went for a light reddy pink colour. This emitted a slightly reddish tint over the scene, which worked well and wasn't too over the top but just right. 

Also, I clicked on 'Exclude' in the panel which opened a new window:


In this new window, I selected my sky dome and clicked 'Exclude'. I had to do this in order to get the light to emit correctly within the sky dome.

Now that I had finished creating the light for the sky dome, I wanted to add another omni light but this time to the lava. I thought I would add an omni light to the lava because lava naturally emits so much light so I felt it would be good to include this.


Like before, I selected an 'Omni' light from the Lights options and placed it on the lava. I made sure to position it roughly in the centre of the lava plane, slightly above the lava. 


After I'd adjusted the settings slightly, I decided on using a pale orange colour and kept the 'Multiplier' at '1.0' intensity. I tried darker shades of orange but I felt that it was too much. The lighter shade gave just enough colour to make the lava look like it was almost glowing.

I was almost tempted to put a light in each of the volcanoes, so it looked like the lava was emitting a certain amount of light. However, when I tried this I didn't think it was necessary because the volcano tops were quite bright now I had added light to the scene anyway. 

Sunday, 11 December 2011

Adding More Volcanoes

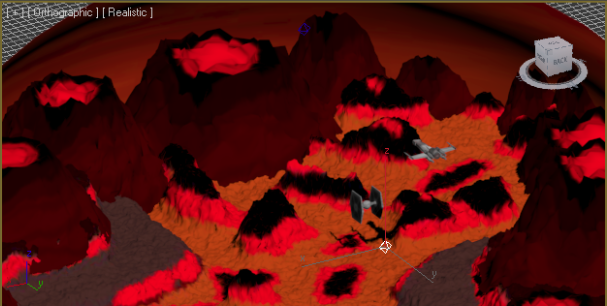
I decided to add a few more volcanoes into the scene to build up the surroundings a bit. I felt that the sides were looking a bit bare and this wouldn't occur in a real setting as you would be able to see in the distance and so on. Also, there was some empty space around my lava plane, and between my sky dome. I needed to make sure this was filled because I didn't want it to be seen in the final animation. 


I simply cloned one of the volcanoes in the scene and positioned them around the lava plane accordingly. I made sure that they were all different slightly by adjusting their scale, making some slightly taller and others wider.


By the time I'd finished, I had volcanoes going all the way around the plane. However, some of these I used to create more of a mountainous feel instead. For example, some of the volcanoes I made sure were positioned more outside the sky dome so you could only see the side, which made them look more like mountains. This worked well as it built up the scenery more without making the volcanoes look over done.


Importing My Ships

Now that my models were completely textured, I wanted to import them all into one file. I decided to import them into the file I had been using to create my volcanic scenery.

Before I imported both the ships, I wanted to group all the components in each together first. This was to avoid altering the ship in the final file when moving them around for animation. 

To group the objects together I simply made sure all the components were selected. I then went to the menu at the top and clicked on 'Group' then the 'Group' option.


My objects were now all grouped together into one.

I was now ready to import the ships into the Volcano file. To do this, I clicked on the 3ds Max icon in the top left hand corner. I then clicked on 'Import' and then 'Merge', and selected the appropriate file.


I had now imported my ships successfully. 


I did have to resize both ships slightly as they were rather small in comparison to the volcanic scenery I'd made. I simply used the 'Scale' tool at the top to adjust them accordingly. 

Saturday, 10 December 2011

Texturing My headhunter Part 7 - Wing Guns

When creating my UV map for the final part of my ship, the Wing Guns, I looked through some of the different settings that were available when creating the map. I came across a different way of mapping out the UV map so it was more logical to see the different parts of the section. I went to the top menu option called 'Mapping' and selected 'Flatten mapping' option available.


This displayed the different faces of the shape so it was clear which part was what. This would probably have been a better way to map out all of my objects when creating textures for them as it was more clear. However, I had no time to go back and re do all the textures I had created so that they followed this style of mapping instead. Besides, I'd already textured the different sections of the models how i'd wanted them anyway so it was not necessary to re do all my work. 

For the final section of my ship, I decided to use this different style of mapping. Here is what the UV map looked like this time:


Once I'd Imported the texture into Photoshop, I loaded up the metal texture I had been using in a different Photoshop Window. 

To begin with, I got the 'Pen' tool and carefully drew round the first (top) map face of the cylinder. As soon as I had done this I copied it and pasted it into the window with the metal texture in it. I made sure the texture image was selected and copied it so that it would only select the texture within the area I had pasted in. I then pasted the cut out of the texture onto the UV map. It didn't matter that some of the texture spread outside of the green lines as these bits would not be shown anyway. 

As soon as I had the first texture positioned in the correct place, I copied it and pasted it onto the map below as it had the same shape. I then followed the same technique to fill the two remaining faces. 

Now that they all had the basic metal texture on them, I wanted to add some more detail in to make then stand out. For the back half of the cylinder, I got the 'Box' tool and created a reasonably thick long horizontal box in the top texture. I then created a thick vertical box that was positioned going through the middle of the previous box. This created a cross shape. I merged these two boxes together and duplicated the layer three times and positioned them on the other three faces. I thought this would be enough detail for the back as I didn't want to go too overboard. 

After I had completed the texture for the back half of the cylinder, it was now time to create the front half. On the first face, I got the 'Box' tool again and drew three black vertical boxes which I made sure were evenly spaced out.  I then got the 'Line' tool and drew two thin horizontal lines going down the middle, through the vertical lines. I merged these layers and then, like before, I duplicated it three times and positioned them on the remaining faces. This gave a kind of mesh effect going round the cylinder, which I thought looked quite appropriate considering it was a weapon.

On the pointed front part of the cylinder I simply drew a thin black line going along the middle, using the 'Line' tool. I copied and pasted this on all the other faces too. I felt this was just enough detail for such a small part. The line almost created an indent feel on the texture, which added to the weapon style I was going for.

The only parts of the cylinder that remained to be textured was the two ends. For these, I got the 'Brush' tool and selected a vibrant red colour. I then drew around and filled the two end circles. I chose this colour because I wanted to add a slight bit of colour to the texture just to make it stand out. It worked especially well for the front point of the cylinder as the red made it look deadly. For the back larger circle, I got the 'Ellipse' tool and drew a small black circle within the area, and then with the brush tool I made a small red dot in the middle. I did this because I felt leaving this part completely red would be too bland. 

Here is what the final texture looks like:


Here is what the texture looks like on the ship: