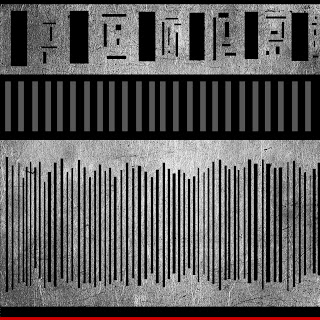
Once I'd imported the engine cylinder UV into Photoshop, I then added the metal texture to it so that it matched the rest of the ship.
I then drew a very thin black box that stretched across the very top of the image. This made the front tip of the cylinder black as I didn't want to use the metal texture here, and thought the black would distinguish it more and draw more emphasis to the hole I'd created at the front of the cylinder.
After this, I drew another thin box across the bottom of the image and filled it a bright red colour. I created a slightly thicker line directly above it and made it black. This made the very back tip of the cylinder bright red, which I thought was appropriate as they should have some kind of flame coming out of them to make that would cause them to become hot and burn red slightly. I made the next line black too simulate a kind of blackened ash effect on the metal.
On my cylinder there is a part which is indented slightly which I wanted to draw attention to and make it different to the rest of the cylinder. Because of this, I decided to draw a thick black box across the lower top half of the image, where the indent was. I made sure it was wide enough to fully cover the area of the indent. I then wanted to add a little more detail to draw even more attention and to get more of a mechanical feel again. I did this by creating reasonably thin grey boxes within the black box, that were positioned vertically. I made sure they were positioned equally apart too.
Now that I had textured the indented part of the cylinder completely, I wanted to texture the remaining front half of it as I didn't want to leave it empty with just the metal texture. Because of this, I went on to create six quite thick, vertical black boxes along the very top half of the image that was empty. I made sure they were positioned fairly evenly. I then went on to use the 'Box' tool again to create various lines and small boxes in the spaces between the large black boxes I'd made. I made this detail random as I didn't want it to look too structured.
On the remaining bottom half of the image, for the back half of the cylinder, I wanted to add some different detail of some kind so that it wasn't similar to the detail at the front. I eventually decided that I would completely fill the area with varying vertical lines. I still decided to keep using the 'Box' tool to do this as it gave me more freedom as to the width I wanted the lines, rather than having to keep adjusting the width at the top with the 'Line' tool. I went on to draw vertical lines across the image, making sure the lines were different from each other by making some thinner than others and longer etc.
Firstly, I drew a thin black box at the very top of the image.
Here is what the texture looks like on the ship:


No comments:
Post a Comment